
Decide whether this valve fits the job before brew day
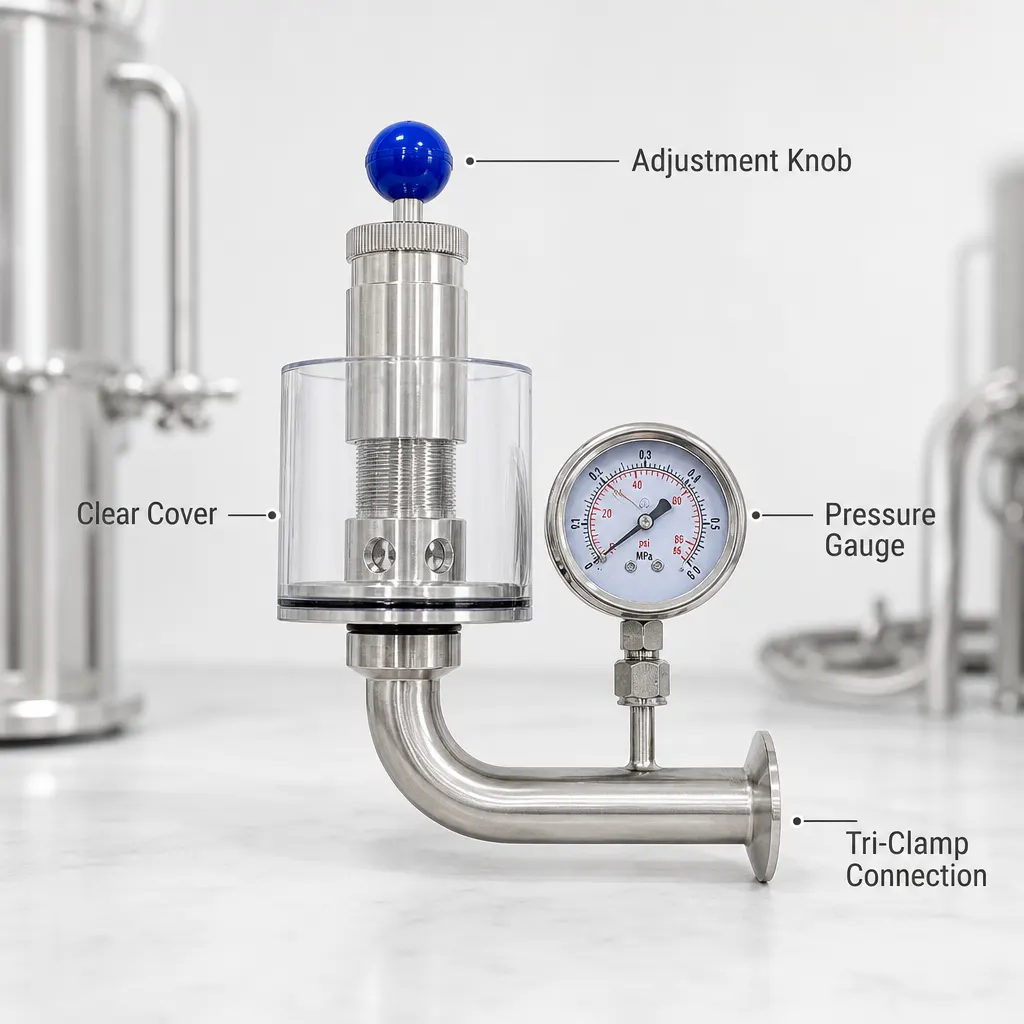
If you are considering a tri clamp spunding valve UK setup, start with three checks: confirm that the fermenter has a mating sanitary clamp connection, make sure your intended pressure falls within the stated 0.2–2.2 bar range, and identify every clamp, gasket or adaptor needed to complete the assembly. This MXBAOHENG model is described as normally closed below the selected pressure and able to release gas when pressure exceeds that setting. It can therefore regulate process pressure within its documented range, but the available product information does not establish it as independent emergency over-pressure protection for a vessel.
That distinction matters when a 20–25 litre brew is already scheduled and an unused fermenter port appears to accept the valve. The title describes a 1.5-inch tri-clamp model with a stainless steel pressure gauge, while the wider diameter information states 1 to 1.5 inches and DN25 to DN40. Do not resolve that mixed wording by appearance alone. In the homebrew workshop, the buying decision should depend on a confirmed mating connection, an appropriate operating range and a complete route for controlled venting—not simply on the stainless construction or the presence of a gauge.
Map the pressure-control job in the homebrew workshop
During pressure fermentation, gas produced inside the vessel raises its internal pressure. The documented operating description for this valve is straightforward: it remains closed when gas pressure is below the selected value and automatically releases pressure when that value is exceeded. The adjustable pressure scale is intended to let the operator change the setting for different working conditions. In practical terms, the valve belongs at a suitable pressure connection on the vessel, with its exhaust route unobstructed and its gauge positioned so it can be read without moving or disturbing the assembly.
A similar control point may be useful when arranging a closed transfer from a pressure-capable fermenter, but the valve is only one part of that workshop process. It does not by itself provide the gas supply, receiving vessel, liquid route, seals or other connections. Nor does the presence of a gauge establish how accurate or repeatable a selected setting will be; no such performance figures appear in the documented facts. Treat the displayed pressure and visible venting as information to monitor while following the documented limits of every vessel and component in the assembled system.
Check the 0.2–2.2 bar range against your planned process
The documented adjustment range is 0.2–2.2 bar. For buyers reading recipes or workshop notes expressed in pounds per square inch, that is approximately 2.9–31.9 psi. This conversion helps you compare units, but it does not select a fermentation pressure for you. Before buying, write down the pressure window required by your planned method and compare the whole window with the valve range. If the process needs adjustment below 0.2 bar, this model’s stated lower limit does not cover it. If it could exceed 2.2 bar, the documented adjustment range does not cover that requirement either.
The relevant pressure is not the only number to check. The listing gives a medium-temperature range of -10°C to +90°C, also shown as 14°F to 194°F. Compare the temperatures expected at the valve with that stated range, including cleaning or workshop conditions where relevant. Staying inside a listed temperature range does not answer questions about vessel limits, gauge performance or suitability for a particular recipe. The useful buying test is narrower: can the valve’s documented pressure and temperature ranges accommodate the conditions you have already established for your equipment and intended process?
Resolve the tri-clamp connection wording at the fermenter
Connection fit deserves a physical check because the public wording is not completely uniform. The product title calls this a 1.5-inch tri-clamp spunding valve, while the dimensional bullet states “1 inch–1.5 inch” and “DN25–DN40”. Those descriptions should not be treated as proof that the valve will fit every port carrying one of those labels. Record the markings on your fermenter connection, compare its mating face with the valve information available at purchase, and ask for clarification if those details do not align. A pressure component that cannot be securely joined is a mismatch regardless of its adjustment range.
The documented information also does not provide a confirmed box-contents list for the connection hardware. Although the title identifies an L-type valve with a stainless steel pressure gauge, it does not explicitly confirm that a clamp, gasket or adaptor is supplied. In your homebrew workshop plan, list those items separately until their inclusion has been verified. Check whether the available fermenter port can carry the complete assembly without conflicting with another fitting, and make sure there is room to view the gauge, reach the adjustment control and keep the transparent cover accessible.
Use the transparent cover as a visible venting check
The valve has a transparent movable PC cover. The product description says water can be added inside this cover until the liquid reaches the exhaust port, allowing bubbles to be seen when pressure is released. That gives the brewer a visible indication of venting behaviour rather than relying only on sound. Use that observation for what it shows: gas is passing through the covered exhaust area. It does not prove gauge accuracy, establish a precise release rate or demonstrate that every other joint in the pressure assembly is sealed.
The cover is also described as suitable for soaking and rinsing with alcohol to meet hygiene needs. Keep that instruction limited to the removable PC cover; the available facts do not provide a complete cleaning method for the assembled valve or specify an alcohol concentration, contact time or wider sanitation procedure. The stainless steel body is described as rust resistant, corrosion-resistant and easy to clean. Even so, inspect the visible surfaces, cover and connection area before assembly so residue, damage or an obstructed exhaust route is not overlooked at the packing bench or brewing-workshop sink.
Avoid mismatches the product facts cannot resolve
This valve should not be chosen solely because a fermenter is described as pressure capable. It is a poor match where the vessel connection has not been confirmed, where the intended setting lies below 0.2 bar or above 2.2 bar, or where the expected medium temperature falls outside -10°C to +90°C. It is also unsuitable as a complete ready-to-connect answer when you still require an unconfirmed clamp, gasket or adaptor. The stainless body and gauge do not remove those compatibility questions, and the public information gives no figures for gauge accuracy, leak rate or setting repeatability.
Do not confuse controlled process venting with a complete protection strategy for the fermenter. The facts explain normally closed behaviour and automatic release above the selected setting, but they do not document an emergency rating or establish this valve as a replacement for vessel-specific protective equipment. Buyers seeking that role need separate, explicit documentation rather than an assumption based on the words “pressure relief valve” in the listing. Likewise, a closed-transfer brewer should not expect one valve to prevent air exposure: the result also depends on the condition and arrangement of the vessels, seals and transfer connections.
Follow a pre-brew assembly checklist at the workshop bench
Connection and range checklist: identify the exact fermenter port you intend to use; compare it with the title’s 1.5-inch tri-clamp description and the separate 1-inch to 1.5-inch, DN25 to DN40 wording; confirm whether a clamp, gasket or adaptor is included; and obtain any missing connection parts before brew day. Write the intended pressure in bar and, if your notes use psi, compare it with the approximate 2.9–31.9 psi equivalent of the documented range. Confirm that the expected medium temperature remains between -10°C and +90°C.
Setup and aftercare checklist: position the valve so the pressure gauge can be read and the adjustment control reached; keep the exhaust area clear; and check that the transparent PC cover can be removed without dismantling unrelated equipment. If using the bubble indication, add water only as described, up to the exhaust-port level, and observe venting without treating bubbles as a measurement of accuracy. After the job, follow the stated option to soak and rinse the movable PC cover with alcohol, clean the accessible stainless body, and inspect the connection surfaces before storage or reassembly.
Make the final buying check with the vessel beside you
The most grounded next step is to inspect the actual fermenter in your UK homebrew workshop rather than ordering from the nominal size alone. Photograph or note the available port, determine whether another component already occupies it, and list the connection hardware you possess. Then compare your intended operating window with 0.2–2.2 bar and your expected medium temperature with -10°C to +90°C. If the connection wording remains ambiguous or the required clamp and gasket are not explicitly listed, resolve those points before the valve becomes part of a scheduled brew-day assembly.
Choose this model when its documented range suits the job, the mating connection has been confirmed and the transparent-cover arrangement is useful for observing venting. Look for another solution if you need settings outside that range, require a different connection, or need performance information not provided here. Keep independent vessel protection and the limits of the rest of the pressure system as separate checks. That approach turns a stainless valve with an adjustable scale and gauge into one deliberately selected workshop component, rather than an expensive fitting that only reveals a mismatch when fermentation is ready to begin.