
Decide whether this valve fits the pressure-fermentation job
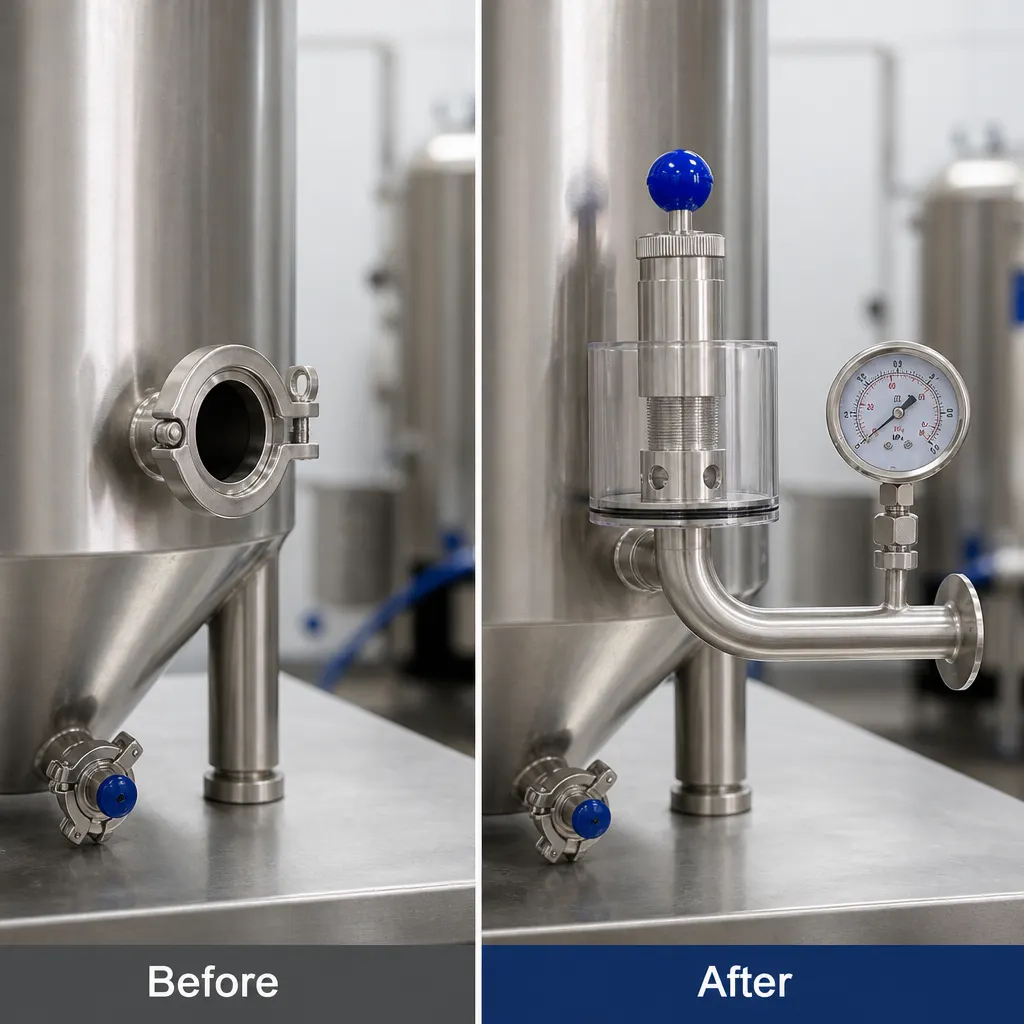
A 1.5 inch tri clamp spunding valve for pressure fermenter use is worth considering when the vessel has a matching sanitary clamp connection and the planned process sits within the valve’s documented 0.2–2.2 bar adjustment range. This model is normally closed below the selected pressure and releases gas when pressure exceeds that value. Before buying, compare the fermenter port physically with the valve dimensions, confirm that 0.2 bar is low enough for your intended process, and identify every clamp, gasket or adaptor needed to complete the assembly. Do not rely on the product title alone to establish compatibility.
This is a pressure-regulating component rather than a complete fermentation system. In a UK homebrew workshop, the practical decision depends on the pressure-capable vessel, its available port, its documented operating limits and the other equipment already fitted. The public product information describes an adjustable stainless-steel valve with a pressure gauge, a movable transparent PC cover and visible bubbling when the cover is filled to the exhaust-port level. It does not document every connection part, gauge performance characteristic or separate vessel-protection component, so those checks remain part of the buyer’s job before the wort enters the fermenter.
Map the valve’s job on the homebrew workshop fermenter
The operating description is straightforward: when gas pressure is lower than the selected valve setting, the valve remains closed; when pressure exceeds that setting, it releases pressure. On a pressure fermenter, that makes the valve a controlled gas exit rather than a gas source. Fermentation produces gas inside the vessel, and the valve governs when some of that gas can leave. The selected threshold therefore needs to suit both the intended brewing process and the fermenter’s documented limits. A pressure-capable label on the vessel does not, by itself, tell you which valve setting to use.
The transparent movable cover provides another observation point in the workshop. The storefront states that water can be added inside the cover until the liquid reaches the exhaust port, allowing bubbles to be seen when pressure is released. That visual indication can help distinguish obvious venting from a valve that remains closed, but it should not be treated as a measurement of flow or proof of gauge accuracy. The product title identifies a stainless-steel pressure gauge, yet the supplied facts do not provide an accuracy tolerance, calibration method or repeatability figure. Use the gauge as described, without assuming undocumented precision.
Check the tri-clamp port rather than trusting the nominal size
The most important mechanical check is the actual mating connection. Although the title calls this a 1.5-inch tri-clamp valve, the documented diameter information also states 1–1.5 inches and DN25–DN40. That broader wording is a reason to verify the precise dimensions rather than assuming that every component described as 1.5 inch will mate correctly. Inspect the fermenter’s available ferrule, compare its shape and dimensions with the valve connection, and check whether another fitted component already occupies the intended port. A nominal size is a starting point for comparison, not a substitute for checking the hardware on your bench.
Also establish how the joint will be completed. The public information describes the valve and its movable PC cover, while the title identifies the gauge, but it does not provide a confirmed kit-contents list for a clamp, gasket or adaptor. Treat those items as unconfirmed rather than included. Lay out the fermenter, valve and any existing connection hardware before brew day, then account for the sealing component and fastening component required by your particular vessel. If the port uses another connection format, an adaptor may be needed, but the appropriate type cannot be determined from the valve listing alone.
Compare the 0.2–2.2 bar range with the intended process
The documented adjustment range is 0.2–2.2 bar, approximately 2.9–31.9 psi. That conversion is useful when a recipe, fermenter document or existing gauge uses psi, but it does not establish a recommended fermentation pressure. Start with the limits and instructions supplied for your own vessel and process, then see whether the entire intended operating window falls inside the valve’s range. A planned setting below 0.2 bar is outside the stated adjustment range, even if it is only slightly lower. Equally, needing more than 2.2 bar would put the planned job beyond the documented upper limit.
Range is not the same as control quality. The listing establishes that the pressure scale is adjustable and describes the valve’s opening behaviour, but it does not state gauge accuracy, adjustment resolution or set-point repeatability. Buyers who need tightly documented measurement performance should not infer it from the presence of a gauge or from the stainless-steel construction. For an ordinary workshop comparison, write down the lowest and highest pressures your documented process requires, note whether the source uses bar or psi, and compare both ends with 0.2 and 2.2 bar. If either end falls outside, choose a different range rather than improvising.
Keep process regulation separate from vessel protection
A spunding valve regulates pressure during the intended process, but it should not automatically be treated as the fermenter’s independent emergency over-pressure provision. The storefront uses both spunding-valve and pressure-relief-valve language, yet the supplied facts do not establish a vessel-specific safety role or confirm compatibility with any particular fermenter’s protective system. Check the fermenter manufacturer’s documentation to find out what protective components must remain installed and unobstructed. The presence of this adjustable valve does not answer that separate question, and an unused port should not be repurposed without understanding what the vessel requires.
This distinction matters because normal control and backup protection answer different questions. The spunding setting determines when the valve is intended to vent during the brewing process; independent protection addresses conditions outside normal control. Do not remove, block or replace a vessel-specified protective component merely because the spunding valve can release gas. If the fermenter documentation is unclear about port allocation, pressure limits or required protective equipment, pause the build and obtain the missing information before pressurising it. A complete pressure-control assembly is one that matches the vessel instructions, not simply one that can be physically clamped together.
Use this bench checklist before assembling the fermenter
Bench checklist — size and surface: identify the fermenter’s exact available port and compare its mating face and dimensions with the valve rather than relying on the 1.5-inch title. Note that the listing also gives a diameter span of 1–1.5 inches, or DN25–DN40. Inspect the intended joint surfaces and confirm that the correct sealing and fastening parts are available. Setup and contents: account separately for the valve, the title-listed stainless-steel pressure gauge, the transparent movable PC cover, and any clamp, gasket or adaptor. The latter items are not confirmed by a documented kit-contents list.
Bench checklist — environment and aftercare: confirm that the process stays inside the documented medium-temperature range of −10°C to +90°C as well as the 0.2–2.2 bar pressure range. Decide whether you intend to use water in the transparent cover to observe bubbles at the exhaust port, and leave enough physical room to view and remove that cover. The storefront says the PC cover can be soaked and rinsed with alcohol, while the valve body is described as 304 sanitary stainless steel with rust- and corrosion-resistant construction. Follow those documented points without substituting an unsupported cleaning or maintenance claim.
Run a controlled assembly sequence before brew day
First, keep the fermenter out of service while checking the connection. Confirm the vessel’s documented limits and required protective components, identify the correct port, and make sure the valve will not displace equipment the fermenter needs. Second, compare the actual connection dimensions and gather the appropriate clamp, gasket or adaptor if required. Third, establish the intended pressure window in one unit, converting between bar and psi where necessary. Verify that the whole window sits between 0.2 and 2.2 bar and that the process temperature remains between −10°C and +90°C.
Fourth, fit and operate the assembly only in accordance with the fermenter instructions, beginning from a known depressurised condition where those instructions require it. Set the valve for the intended documented process rather than copying an unexplained number from another setup. Fifth, if using the transparent cover as described, add water only to the stated exhaust-port level and observe whether bubbles appear as pressure is released. Finally, after the workshop session, attend to the removable cover using the documented soak-and-rinse option. Visible bubbles can show venting activity, but they do not validate the gauge or prove the whole assembly is leak-free.
Recognise the mismatches that should stop the purchase
Do not choose this valve if your intended operating range extends below 0.2 bar or above 2.2 bar, if the process medium will fall outside −10°C to +90°C, or if the fermenter connection cannot be matched confidently. It is also a poor fit when you need documented gauge accuracy, calibration or adjustment repeatability, because those details are not provided in the public facts. Buyers expecting a confirmed all-in-one fitting kit should pause as well: the available information does not establish that a clamp, gasket or adaptor is included. These are compatibility gaps, not details to discover once a filled fermenter is waiting on the bench.
If the checks do line up, the next step is a dry layout in the UK homebrew workshop. Place the valve beside the intended ferrule, list the connection pieces you can positively identify, and write the required process range in both bar and psi. Keep the vessel’s independent over-pressure provision as a separate line on that list. Only proceed when the port, pressure range, temperature range and necessary hardware can all be reconciled with documented information. That approach gives you a useful buying decision without assuming that stainless construction, a gauge or a matching nominal label answers every setup question.